Getting Started
Let’s go over the Icons and their functions in the MatLib shelf.
Material Library
Material library, as it is called, is the main window where you create, store and import materials to your scene.
Runing Material Library for the first time
When MatLib runs, if it is used for the first time or if the repository you used before has been deleted, it will allow you to select a folder to create a new repository named as ‘Default Repository’ and will automatically link the repository path to MatLib.
Make sure you select a location that has enough space.
Jump to Video
User Interface

There are 6 sections in the interface:
Renderer Selection
Repository Selection
Categories
Materials
Content Display
MenuBar
Renderer Selection
Renderer Selection lists all the render engines that are registered on your DCC application which MatLib can support.
If you have more than one renderer that is supported by MatLib, since the properties of the materials belong to different renderers, switching between them will change the categories and materials.
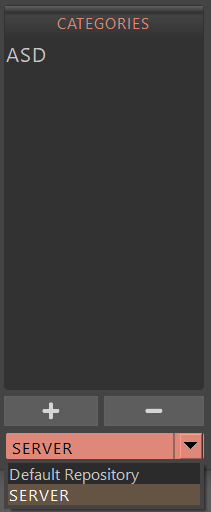
Repository Selection
The repository is the area where the files and folders required for MatLib are stored. The selected repository calls and displays the registered categories and materials under these categories.
This is the area where you will choose which repository MatLib will run on.
Tip
Additional repositories are useful for collaboration. For personal use, this is not an important subject since most likely you do not need to create additional repositories.
When you link a new repository, it is added to this menu with the given name.
When a repository other than Default Repository is selected, it will appear in a slightly reddish color as a reminder.
Categories
Categories are areas where materials are stored. For example, materials such as chrome, copper, and aluminum fall into the category of metals. Basically it is a list of material types based on which renderer is selected.
By changing the renderer or the repository, Category section will be updated accordingly.
Create a Category
To create a category, you must give the category a name (such as metals) on the dialog screen that opens after pressing the + button under the category section.
Pressing the accept button will immediately add the new category to the Categories menu.
Jump to Video
Delete a Category
To delete a category, you need to type ‘YES’ in capital letters in the dialog screen that opens after pressing the - button.
Since some repositories are protected with a password, the password screen will appear after pressing the - button. If the correct password is entered, a dialog screen will pop up asking if you are sure, same as unencrypted repositories.

Warning
Deleted categories do not have backup files, so the deletion cannot be undone.
Jump to Video
Materials
This is the area where the materials in the selected category are displayed.
The buttons in the lower left corner are used to add or remove materials from the selected category.
Add a Material
To add a material, first make sure that the render engine is the same as the “Renderer Selection”.
After choosing the right render engine, enter the desired aspect ratio in the render settings. This ratio is important for the size of the icon to be used for the material.
Assign the material to an object of your choice.
Render the material with Maya’s native renderview.
Warning
Do not try to render with render engine’s own frame buffer. Since not all of the render engines have Python support for frame buffer, current version of MatLib only works with Maya’s native frame buffer.
When the rendering is complete, select the Shading Group (SG) node of the material from Hypershade or NodeEditor and click the Add Material to Category button in MatLib. Pressing this button will open up a new dialog screen and ask you to fill in the material name and description.

Tip
In Maya, all materials come with a shading group attached to it. It holds information such as the lights that illuminate the material, the object that uses this material, and what kind of material has been added to shading group.
The material name is the label of the material that will be included in the material icon. This is also important for the search bar.
The description is, where you can put some notes about the material.
It is possible to change the description later on from the Edit tab. It does not have to be filled.
Jump to Video
Delete a Material
After selecting the material to be deleted from the MatLib window, click the Delete Material from Category button at the bottom left. As with deleting a category, typing ‘YES’ in capital letters at the dialog screen asking if you are sure, will delete this material.
If the repository is protected by a password, you must first enter the password correctly in the window that appears.
Warning
Deleted materials do not have backup files, so the deletion cannot be undone.
Jump to Video
Import Material
As the naming suggests, this will import the material information and generate the materials into the current scene. After the material is created you will just need to assign the material to an object.
Jump to Video
Search Bar
Search bar will hide all the other materials which do not have all the characters in their material name from the selected category.
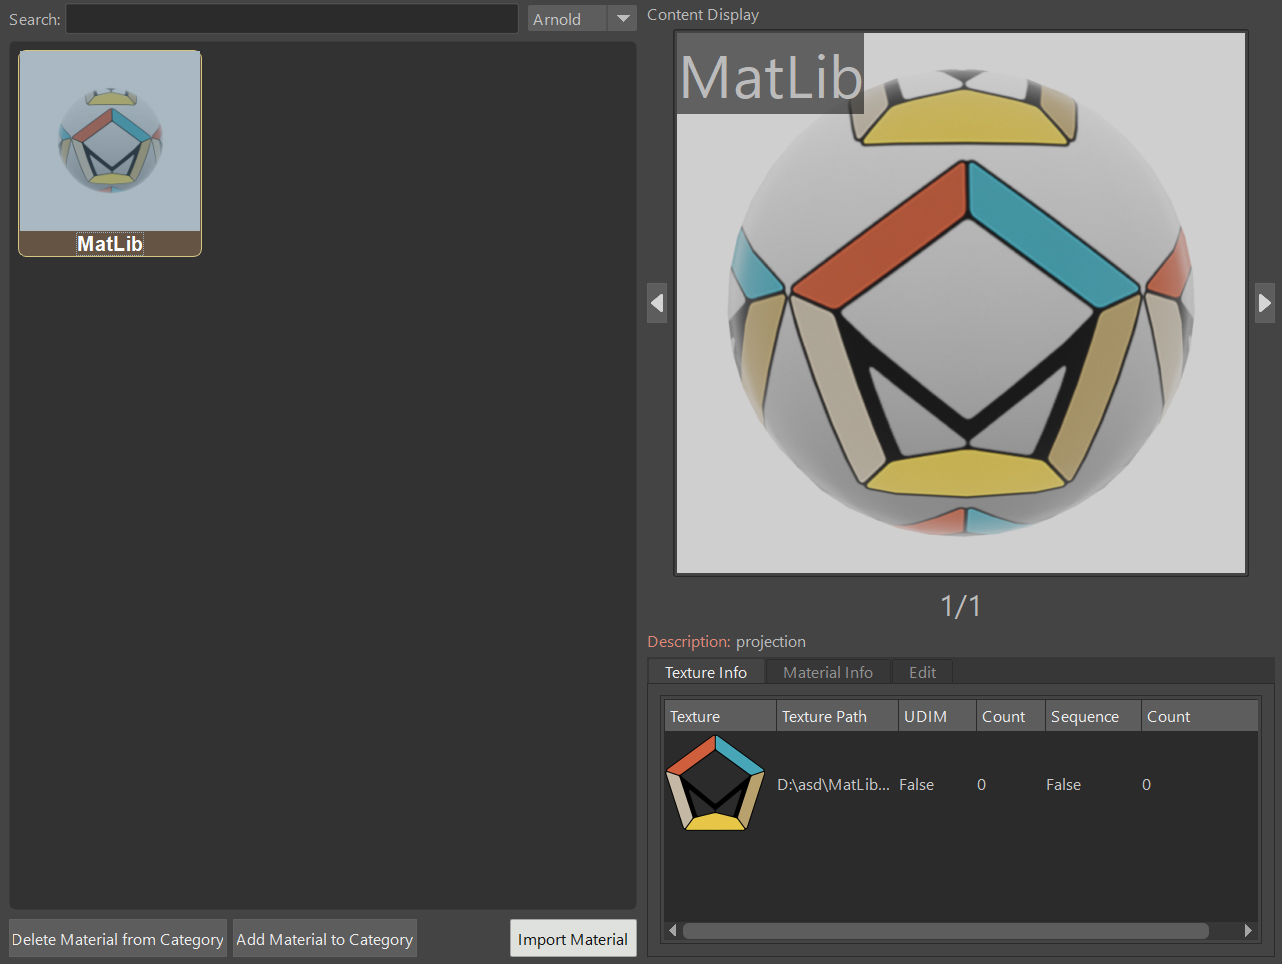
Content Display
This area is the section where information about the selected material is displayed.
At the top, it shows the images used for displaying the material. When the material is created, a larger version of the render image is used to display in this section. It is possible to add more images to the screen.
The number of images added to the material screen is shown just below the image.
Use the left and right arrows next to the image to navigate through images.
At the buttom of the image display there is the description, displaying the written text when creating the material.
Underneath the description there are 3 tabs for editing and displaying the material.
Texture Info
The textures of the selected material are listed in this section.
If the node has UDIM or sequence properties, it provides information about the presence and number of images.
Warning
If the material has .EXR or .HDR texture formats, it fails to display them on the texture info tab.
Jump to Texture and Material planels Video
Material Info
The material attributes of the selected material are displayed. The user can choose which of these attributes to display by clicking the Material Config button on the Edit tab.

Edit
Edit tab is responsible for making changes on material di̇splay.
There are couple of buttons in this tab, let’s take a look at them one by one.

Add Image To Display
You can add more images to the image di̇splay of the selected material by selecting an image either from File or from Renderview button.
The File button will let you choose a file from a folder.
The Renderview button will pick up the current image on the renderview.
Replace Main Image
You can replace the main image on the image viewer by selecting an image either from File or from RenderView.
The File button will let you choose a file from a folder.
The Renderview button will pick up the current image on the renderview.
Remove Image
Remove Image button deletes the image displayed in the image viewer.
Primary image can not be deleted.
Jump to Add, Remove and Replace Video
Description
It allows you to change the description of the selected material.
Type something on the editible line and press Replace button.
Jump to Edit Description Video
Material Info Config.
Material Info Config button opens up a window where you can select which parameter and its value will be displayed on the Material Info Tab.

The menu at the top of the window contains the supported material types. The parameters of each material are listed just below.
The parameters you will mark here will be reflected in the material information tab when the Save Changes button below is pressed.
MenuBar
Repository
Repository is a central location in which material data is stored and managed.
It is designed so that people sharing the same network can access the common material pool.

Create Repository
This button is used to create a new repository outside of the existing one.
It prompts for a password to avoid creating a repository carelessly by the user.
After the password screen, a folder dialog screen will pop up and ask you for a location the new repository to be created. After choosing the location, it will ask for a repository name to be displayed on the MatLib window, and a password.
Unlike the general password that is used for creation and deletion of repositories, this can be set by the user if preferred.
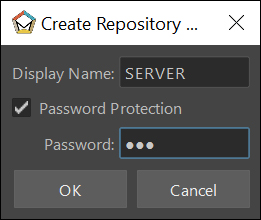
Password protected repositories will ask for a password when deleting a category or material.
Jump to Create and Link Repository Video
Tip
When the repository is created, the connection to MatLib is not automatically established. In order for the connection to be established, click on the ‘Link Repository’ from the Repository menu and select the MatLib Repository folder from the pop up window.
Note
Why password protection for a repository?
Short answer is, preventing user errors.
When you are working on a shared network with other people, someone might mistakenly delete the materials or categories. When password protection is established, these actions such as material deletion will ask for a password.
Delete Repository
This button deletes the desired repository except the ‘Default Repository’. This operation physically deletes the related files from the location they are attached to.
The deletion process is encrypted as the repository creation. After entering the password, the list of repositories connected to MatLib will be displayed on the screen. After selecting the repository name you want to delete, click accept, and the process will take place.
Jump to Video
Link Repository
This button is used to link an existing repository that has not yet been added to MatLib.
When clicked, select the repository folder called ‘MatLib_Repository’ from the file dialog.
When the operation is successful, the new repository is added to the repository selection menu in the MatLib window.
Unlink Repository
This button will disconnect the selected repository. Unlike Delete Repository this does not delete the folder structure.
Jump to Video
Transfer
The Transfer screen is used to copy materials between existing categories within a repository or among repositories.
For instance, if you have a material on your personal repository that you want to copy to a shared repository, the Transfer action will accomplish the task.
In the Transfer interface, on the left-hand side select the source repository that holds the material to be copied from top left corner, then select the category which you want to copy from and the material which you want to copy below the source repository. On the right-hand side select the target repository which the material will be copied to from the top right corner, and then select the target category below to transfer. After selecting from all 3 columns, press Transfer.
Jump to Video

Password
Caution
Since repository passwords can be easily recovered, use a simple password.
Admin password
Password = 123admin
For repository creation and deletion, password is asked by MatLib. It is more of a warning question whether the user has taken any conscious action.
Unlike repository creation passwords, this cannot be changed.
Recovering a password from Password Protected Repository
From Script Editor create a new Source Type as Python
On the Python tab type:
import MatLib_tools
MatLib_tools.password_recover('name of the repository')
Inside the quotation mark type the name of the repository
Press Cntrl + Enter
Tip
You can open up the Script Editor panel from Windows/General Editors/Script Editor

Reset Links
This is only useful when MatLib is unable to load. It will clean all the repository paths so MatLib will run as if it is running for the first time.
Transfer to Project
All images that are imported to the scene with MatLib or files which do not belong to the project folder are copied to the project folder and the paths of the nodes that read the images are renewed with this function.
There are 2 options avaliable:
Repath nodes and Copy Files
Repath nodes only
In order to use this action, first press the Transfer to Project icon, then select either Repath nodes and Copy Files or Repath nodes only. Then you need to select all the Shading Group (SG) nodes that you want to make the change from Hypershade or NodeEditor and press Execute .
Repath nodes and Copy Files
This selection will repath all of the node’s texture paths and copy all of the texture files to {project folder}/sourceimages/MatLib_images .
The progress bar will display the state of copying process.
Repath nodes only
This selection will repath all of the node’s texture paths to {project folder}/sourceimages/MatLib_images .
This is useful when you have a project with many shots and you have already copied all the necessary files to the project.
Jump to Video